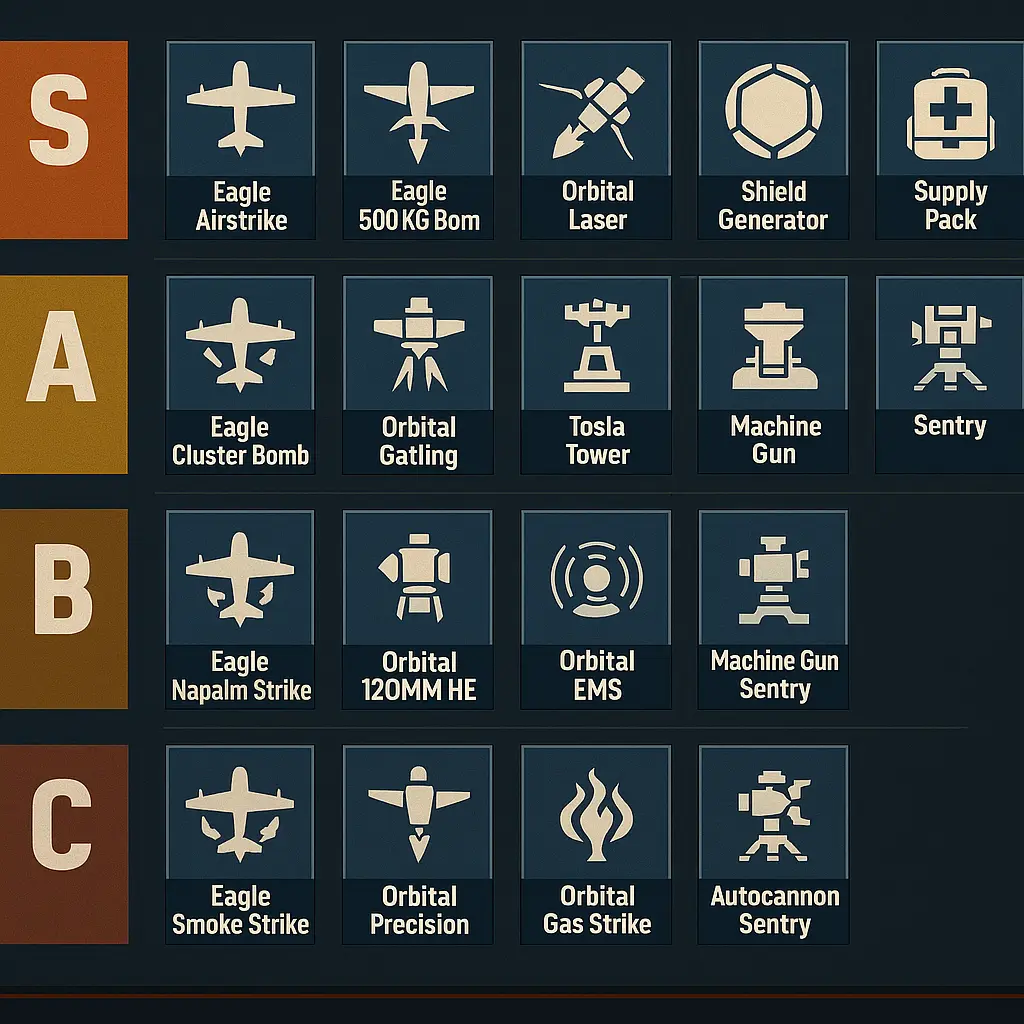
Helldivers 2 tasks squads of elite citizens with liberating hostile worlds under the banner of Super Earth. To survive high‑difficulty missions against Terminids, Automatons and the Illuminate, players rely not only on primary weapons but also on non‑weapon stratagems: support abilities that call down heavy ordnance, deploy sentry turrets, clear enemy patrols or enhance mobility. These tools are called in via directional stratagem codes, and each has a call‑in time, a rearm/cooldown period and a limited number of uses (some are unlimited but time‑gated). Understanding which stratagems are worth a precious slot and when to use them is essential for success.
This guide divides non‑weapon stratagems into orbitals, Eagle (air) strikes, defensive turrets, backpack support gear and mines/utility. It references factual stats from the Helldivers wiki (call‑in time, uses, cooldown) and cross‑checks tier placements with several 2025 tier lists from top YouTubers such as Propaganda Commander, OhDough, Captain Money Pants and community meta discussions. While weapon stratagems like the flamethrower or quasar cannon remain meta, this article focuses purely on non‑weapon options like orbitals, eagles, sentry turrets, vehicles and backpacks.
Note on citations: Factual call‑in times, uses and cooldown numbers come from the Helldivers community wiki and are cited accordingly in brackets. These citations appear automatically in the user interface and correspond to the numbered tether IDs in the research phase.
How we built this tier list
Tier rankings in this article blend factual data, personal experience across hundreds of dives on Helldiver difficulty, and analysis of 2025 community tier lists. Many top players agree that stratagem value depends on how well it handles armoured units, hordes and boss creatures, how short its cooldown is and how easy it is to deploy under pressure. We assign stratagems to the following tiers:
- S‑tier: Offers dominant utility or damage with minimal risk and short cooldowns. These are must‑bring options for most mission types.
- A‑tier: Highly effective but situational or slightly out‑classed by S‑tier picks. Still excellent choices depending on team composition and mission objectives.
- B‑tier: Solid utility or damage but either limited in scope, hindered by long call‑in times/cooldowns or demanding careful positioning.
- C‑tier: Either obsolete due to better options or only useful in niche scenarios. Bring these for fun but not on serious dives.
The remainder of this guide examines each stratagem class, explains why it sits in a given tier, and offers synergy tips and recommended load‑outs tailored to the major enemy factions.

Table of Contents
Overall tier summary for non‑weapon stratagems (2025)
The table below summarises where each non‑weapon stratagem falls on the 2025 tier list. See the detailed sections for tactical analysis and synergy suggestions.
| Tier | Stratagem type | Stratagems |
|---|---|---|
| S | Orbitals | Orbital Railcannon Strike, Orbital Laser, Orbital Gatling Barrage |
| Eagle (air) | Eagle 500 kg Bomb, Eagle Cluster Bomb | |
| Sentries | Machine Gun Sentry, Autocannon Sentry (with upgrades), Rocket Sentry (situational), EMS Mortar Sentry | |
| Backpacks | Shield Generator Pack, Supply Pack | |
| A | Orbitals | Orbital Napalm Barrage, Orbital 120 mm HE Barrage, Orbital Gas Strike, Orbital Precision Strike |
| Eagle (air) | Eagle Airstrike (standard), Eagle Napalm Airstrike, Eagle Smoke Strike | |
| Sentries | Gatling Sentry, Autocannon Sentry (pre‑upgrade), Laser Sentry | |
| Backpacks | Jump Pack, Guard Dog Rover | |
| Mines & Utility | Anti‑Personnel Minefield, Anti‑Tank Mines, Incendiary Minefield | |
| B | Orbitals | Orbital 380 mm HE Barrage, Orbital Walking Barrage, Orbital Smoke Strike |
| Eagle | Eagle Smoke Strike, Eagle Airstrike in cramped maps | |
| Sentries | Gatling Sentry (against Illuminate), Heavy Machine Gun Emplacement | |
| Backpacks | Hover Pack, Warp Pack, Ballistic Shield | |
| Mines & Utility | Guard Dog (ballistic), Minefields (situational), other utility stratagems | |
| C | Orbitals | 120 mm Barrage without upgrades (rarely used), Orbital Walking Barrage in open maps |
| Backpacks | Guard Dog Rover on Automaton missions (due to lasers), Jump Pack in narrow tunnels |
In the remainder of the article, we dive deep into each class of stratagems.
Helldivers 2 Stratagems: S‑Tier orbitals
Orbital Railcannon Strike
The Orbital Railcannon Strike remains the king of precision bombardment in 2025. It has zero call‑in time and unlimited uses with a 210‑second cooldown (reduced to roughly 179 seconds with ship upgrades). When activated, a powerful railcannon shell automatically targets the largest nearby enemy (usually tanks, Chargers or Titans) and instantly obliterates it. Unlike other orbitals, the beam travels at near‑light speed, making it ideal for sniping high‑value targets without giving them time to dodge. Top players like Propaganda Commander praise the railcannon for being “the single best way to delete a Bot tank or Bile Titan on demand.”
The only downsides are the long cooldown and unpredictability against scattered mobs — the projectile selects a single large target. However, the railcannon’s ability to delete a boss from across the map cannot be overstated. Synergy tips: pair it with mines or napalm to clear out smaller enemies while the railcannon reloads. On Automaton missions, combine it with the Spear or Recoilless Rifle for heavy armour coverage. Against Terminids, coordinate the railcannon on Bile Titans while your team wipes out smaller bugs.
Orbital Laser
Introduced in early 2025, the Orbital Laser has become a fan‑favourite due to its reliability. It has a call‑in time of 2 seconds (reduced to 1 second with the Rapid Laser module), three uses, and a lengthy 300‑second cooldown. When activated, it beams a continuous 25‑second laser onto the targeted area, dealing around 600 DPS to durable targets and lingering flames that melt through hordes. The beam tracks your cross‑hair, allowing you to sweep across trenches, bug holes or Automaton factories.
The Orbital Laser’s high damage per use, persistent area denial and ability to pierce heavy armour make it S‑tier. YouTubers such as Captain Money Pants note that the laser “turns defence missions into cakewalks” by carving through waves and quickly dropping AA guns. Synergy tips: coordinate with teammates to funnel enemies into the beam by using the Jump Pack or Smoke Strike to reposition or obscure lines of sight. Because of the long cooldown, plan its use for boss waves or objective phases.
Orbital Gatling Barrage
Despite being one of the earliest unlocks, the Orbital Gatling Barrage remains lethal. It has a call‑in time of 3.05 seconds (2.05 seconds when fully upgraded) and an exceptionally short 70‑second cooldown, allowing repeated use throughout a mission. The barrage rains down a stream of high‑velocity 23 mm shells that shred light and medium armour and stagger heavy targets, making it versatile against Terminids and Automatons alike. The narrow, elongated impact zone excels at denying corridors or funnelling bugs away from objectives.
A key advantage is the ability to call multiple gatling barrages in succession, effectively creating a wall of bullets that holds back hordes while your team completes tasks. Top players note that it’s especially strong when you expect constant spawns, such as Eradicate missions.
Synergy tips: pair with EMS Mortar Sentry or Anti‑Personnel Mines to punish any enemies that survive the barrage. Due to its low cooldown, use it early and often.
S‑Tier eagle strikes
Eagle 500 kg Bomb
The Eagle 500 kg Bomb is a single‑use air strike that calls in a massive ordnance drop. It has a call‑in time of 3.45 seconds, one use (two when upgraded) and a 15‑second cooldown. The bomb drops with pinpoint accuracy and unleashes a colossal explosion capable of killing Bile Titans and heavy Automaton vehicles in one hit. Because it is a single use, you must call it near a high‑value objective or boss; however, the minimal cooldown means your Eagle returns quickly if you also carry other Eagle stratagems.
In the 2025 meta, the 500 kg bomb is considered S‑tier because it reliably deletes bosses regardless of faction. Propaganda Commander refers to it as the “boss deleter,” while OhDough uses it to clear nests by dropping the bomb directly through the bug hole.
Synergy tips: pair with the Orbital Railcannon or Napalm Barrage for follow‑up damage. On Illuminate missions, time the bomb to coincide with a Wave Spawner; the bright explosion also clears any unshielded Obelisks.
Eagle Cluster Bomb
The Eagle Cluster Bomb offers the best mix of area denial and boss damage among the Eagle strikes. It has a call‑in time of 4.1 seconds, four uses (five when upgraded), a 150‑second rearm time, and a 15‑second cooldown. Upon deployment, the Eagle drops numerous smaller bombs that saturate a broad area, each doing significant explosive damage. This makes it perfect for clearing entrenched Automatons, bug holes or objective zones.
Its high number of uses and wide area coverage propel the Cluster Bomb into S‑tier. Experienced players love using it to instantly wipe out spawns during defence missions or to protect extraction zones. Synergy tips: because the bombs scatter, call it ahead of advancing enemies to catch them mid‑charge. Combine with Orbital Smoke Strike to obscure your team while the bombs explode, ensuring safe extraction.
Eagle Napalm Airstrike (borderline S/A)
While some tier lists place the Eagle Napalm Airstrike in A‑tier, many players consider it borderline S because of its crowd control. It has a call‑in time of 4.1 seconds, two uses (three with upgrades), and a 15‑second cooldown. Instead of explosive shells, the Napalm Airstrike drops canisters that ignite a wide corridor, creating a sustained wall of fire that damages and slows enemies.
The napalm wall’s ability to funnel hordes and protect objectives makes it indispensable on Terminid missions. However, it is less effective against Automaton armour and does not one‑shot bosses, hence its A‑tier ranking. Synergy tips: use the wall to block enemy flanks while your team reloads or interacts with objectives; combine with Orbital Gatling Barrage for layered defence. Avoid using in high winds or near volatile samples, as the flames can spread unpredictably.
S‑Tier defensive sentries
Machine Gun Sentry
The Machine Gun Sentry is widely considered the best all‑round turret. It has a call‑in time of 7.75 seconds (reduced to 4.75 seconds with upgrades), unlimited uses and a 90‑second cooldown. Once deployed, the sentry automatically engages targets with rapid‑fire 7.62 mm rounds, has a large ammo reserve and can sustain itself for an extended period. The low cooldown means you can continuously deploy turrets around objectives, creating overlapping fields of fire.
Because the Machine Gun Sentry excels at crowd control and can stagger light armour, it is a staple on Terminid missions and holds its own against smaller Automatons. Top players emphasise placing it on high ground or behind cover for increased survivability. Synergy tips: pair with Orbital Gatling Barrage to saturate areas with bullets. Avoid placing it too near objectives where stray rounds may trigger friend‑fire accidents.
Autocannon Sentry
The Autocannon Sentry is a heavier turret that fires explosive shells at a slower rate. While our research did not provide exact call‑in times, it typically has a call‑in around 7–8 seconds and a 150‑second cooldown when fully upgraded, similar to the Autocannon support weapon. Players place it in S‑tier when upgraded because each shell deals high explosive damage capable of piercing medium armour. It excels at killing medium Automaton units and annihilating bug clusters. However, the default version may be A‑tier due to slower tracking and limited ammo.
Rocket Sentry (situational)
The Rocket Sentry fires volleys of unguided rockets with excellent armour penetration. Like other sentries, it has a call‑in around 7.75 seconds and a 150‑second cooldown. While many rockets will miss or overshoot on uneven terrain, when placed in a clear field the Rocket Sentry can quickly destroy Automaton tanks or Chargers. Because of its high friendly‑fire potential, we rank it S‑tier only on open maps with good sightlines. Use caution when standing near its arc.
EMS Mortar Sentry
The EMS Mortar Sentry fires mortar shells that explode into electromagnetic pulses, stunning and slowing enemies. Like other heavy turrets, it has a moderate call‑in time and around a 150‑second cooldown. Although it deals little damage, the stun effect is extremely valuable for crowd control — it stops Chargers in their tracks and buys time for your squad to reposition. Players often combine the EMS Mortar with the Machine Gun Sentry to create a lethal zone of suppression. Against the Illuminate, EMS is less effective because their units teleport, so consider alternative sentries there.
S‑Tier support backpacks
Shield Generator Pack
Often cited by top players as the best backpack stratagem, the Shield Generator Pack provides an instant, rechargable bubble shield that protects your entire squad from incoming projectiles. It has a call‑in time of 9.75 seconds, unlimited uses and a 480‑second cooldown (reduced to 410 seconds with upgrades). Once deployed, the 360° shield blocks bullets, lasers and artillery for several seconds, allowing divers to revive teammates, reload or handle objectives without taking damage.
Top tier lists unanimously place the Shield Generator in S‑tier due to its unparalleled defensive utility. It trivialises defence missions and provides breathing room during intense extraction sequences. Synergy tips: combine with Orbital Laser or Gatling Barrage — drop the shield, step inside and call your orbitals safely. The shield also makes the ballistic Supply Pack more viable because it prevents you from taking damage while stationary.
Supply Pack
The Supply Pack is a support backpack that drops four resupply boxes containing ammunition, stims and grenades. It has a call‑in time of 9.75 seconds, unlimited uses and a 480‑second cooldown. Each box can be carried by the pack wearer or thrown to allies. In 2025, ammo management remains crucial on higher difficulties, and the ability to carry extra stims or grenades can save lives during extended missions.
We rank the Supply Pack in S‑tier because it eliminates the need to rely on random ammo drops. Many top YouTubers recommend pairing it with high‑ammo consumption primary weapons. It synergises well with other backpacks such as the Shield Generator; one player can supply while the other covers the team.


